After careful preparation of each individual short block component, the final assembly was fairly quick and straight forward. This type of engine is not complicated, in fact it’s quite simple, but focus during the rebuild is still the name of the game to ensure we don’t forget something simple like doing the final torque on a bolt.
So this time, a detailed build sheet was created for this engine as things were moving forward. The idea here was to have enough data to avoid unconfortable questions or doubts when/if troubleshooting something later. Things like clearances, dimensions and orientation of parts, torque figures, some bolts lengths, replacement part numbers and a checklist of things done to ensure nothing essencial is missed. Oh, and of course, lots of photos.
All 6 mains bolts were replaced with their ARP equivalents – Kit # 743-2500. These are 7/16″ bolts, 20 TPI, 2.5″ long, just like the original bolts. This means we don’t need to cut/turn them to length like we have to on Cooper S ARP studs.
The recommended torque setting for an original bolt is 60-65lbft. For the ARP, the recommended value is 70lbft with ARP Ultra-Torque lube. I’ve used that with no issues.
A note here: this engine, even if a little modified, does not actually require this grade of bolts, but since I had them and the crank had some work/effort put into it, I thought it wouldn’t hurt to have them.
After each step is considered final, like having the final torque applied, we need to check if that component still behaves correctly and hasn’t affected other components. For instance, a crank should rotate easily with no dragging or binding anywhere. Crank endfloat should be measured again (vertically) to ensure nothing changed from the dry build to the final build.
Piston ring gaps should be checked / corrected if they’re too small. When a ring gap is too small (less than 10 thousands in this case) the ends of the ring can start to bind as they grow due to thermal expansion and both ends can eventually get welded. The rule of thumb is to have a gap of 0.004″ per inch of bore.
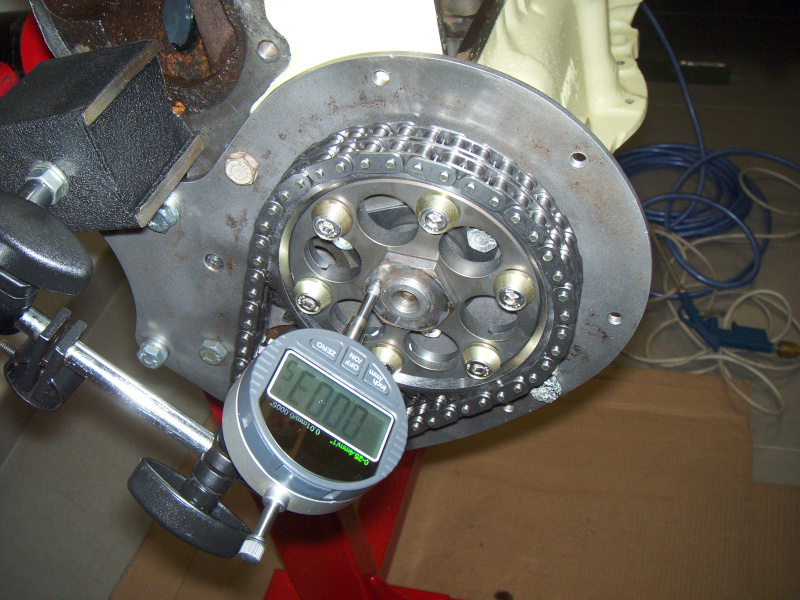
With the rods and pistons in the block, the next step is to fit the camshaft. The one I used was an old cam reground to a modern high lift / short duration type of spec. The cam has a profile close to Swiftune’s SW5 but with a little bit more lift and duration. This will ensure driveability and good manners while having that extra bite compared to the original cam.
The camshaft is the big driver when it comes to how an engine behaves and how we feel it. There’s hundreds of profiles out there so the game here is to find one that suits the engine and our driving style. Then there’s other things, like fueling, ignition timing and gear ratios, which will influence how/if an engine is able to deliver its full potential. This is why sometimes we might find 2 engines with similar specs but one does not perform exactly like the other.
For this engine I’m choosing to be on the mild side of the fence instead of going to the ‘race’ side, so I’m not expecting anything besides reliability and some, non-measurable, fun.
One of the issues I had was the cam gear binding the cam thrust plate. That was identified when I tried to measure the camshaft endfloat and started to get different results according to the rotation of the gear (0.001″ to 0.0035″).
Turns out that some of the new cam gears available today have a generous radius (see first photo where that radius was blued) and if the thrust plate is not centered correctly, the gear will bind. Although all thrust plates can be fitted with a little offset, I didn’t verify this problem with original cam gears – the ones I have don’t have that radius.
The solution for this was to center the thrust plate using the gear and a plastic zip tie to take up the clearance evenly – see second photo. Then both parts were fitted at the same time and the bolts were torqued using a socket through the cam gear holes. After centering the plate the gear and the zip tie can both be removed. If the gear didn’t offered access through the bolts, blueing is a good way to check if the plate is correctly centered.